How to...
This section will answer the most common questions related to working with scripts in MIKE Workbench.
Access data in managers
It is possible to create scripts, which utilize many of the functionalities available in MIKE Workbench. For example, time series can be retrieved from the database and processed. They can also be manipulated using the tools available in the tool explorer and printed as tables or graphs or stored in the database.
In the following, a small script is created, which reads a time series from the database, changes the data in the series and saves it back into the database with a new name.
Create a new storage and insert a simple script template
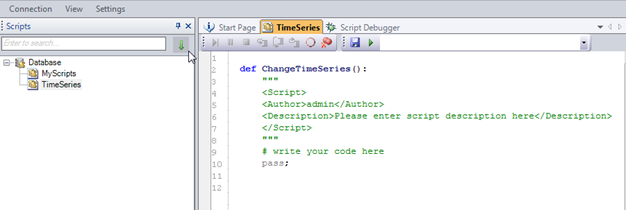
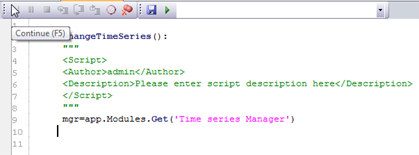
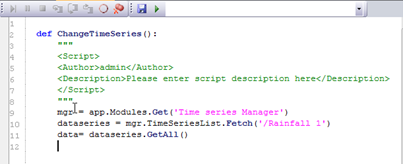
Write a code line to get hold of Time series Manager Module in the code named mgr.
The line shall contains the following information:
- The app object is a built-in representation of the IApplication interface, which is available for scripts.
- The Modules object represent all the modules that are available.
- The Get(string) gets a specific module with the name specified in the string
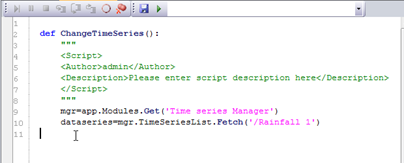
Write a code line to get hold of a specific time series which will be called dataseries
The line shall contains the following information:
- Reference to the Time series Manager specified in the line above and named mgr.
- The TimeSeriesList represent a specific property of the Time series Manager through which methods exist to get data from the database.
- The
Fetch(string)gets a specific time series from the path with the name specified in the string. In the example it is a series names Rainfall 1 located in the root group.
Write a code line to get the specific data from the dataseries
The line shall contains the following information:
- Reference to the time series specified in the line above and named dataseries
- The Get() gets all the data contained in the time series.
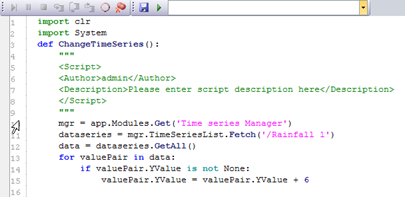
Write code lines to add 6 to each data value in the time series.
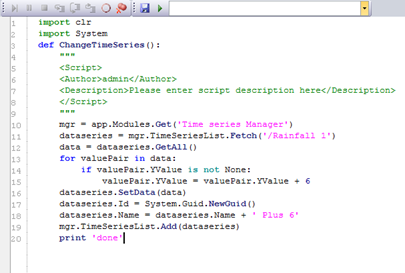
Write code lines to store the time series into the database under a new name.
The lines shall contains the following commands:
- Set modified time series values back to time series object.
- Set the Id to the time series.
- Assign a new name to the time series
- Add the modified time series to database.
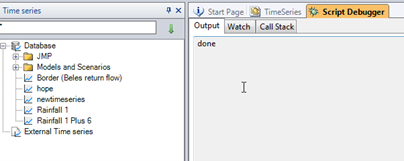
- Print done when the script has been executed.
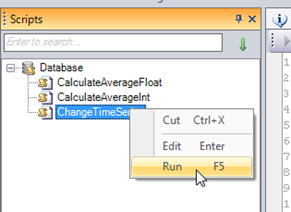
Save and execute the script
After saving, the script can be executed from the script explorer.
The new time series appears now in the time series explorer.
Use tools in scripts
In order to save on development time, it is possible to use existing tools in the script manager.
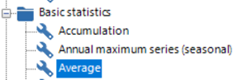
The example below show how to run the timeseries average tool and work with the output.
Identify the tool to use
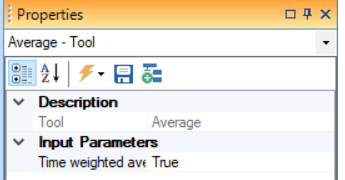
Investigate the inputs
Drag and drop the script in the target storage
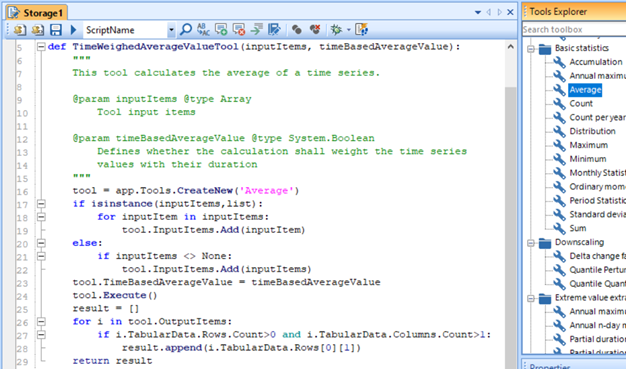
Work with the outputs
One important reason to a tool in a script is to extent its
functionality. This requires the ability to work with its output(s). All
tools have a property called OutputItems holding the results from the
tools. This property is unique to each tool, in the case of the Average
tool, the output is a so called TableContainer.
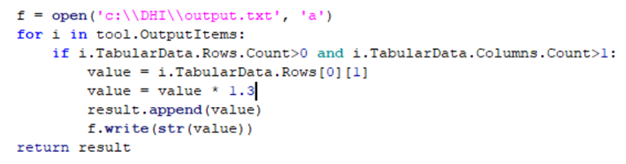
For example, it is possible to interrogate the results, compute a new value and export it in file as we can see below.
Embed script in other script
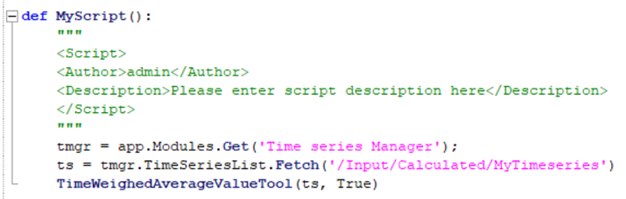
Finally the tool should be embedded in a new script to be used in the script manager.
Call one script from another storage
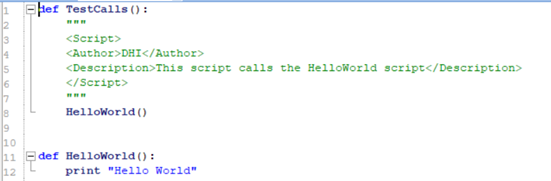
Scripts stored in a given storage can be called directly. As we can see in the image below, the main script (i.e. TestCalls) can directly use HelloWorld.
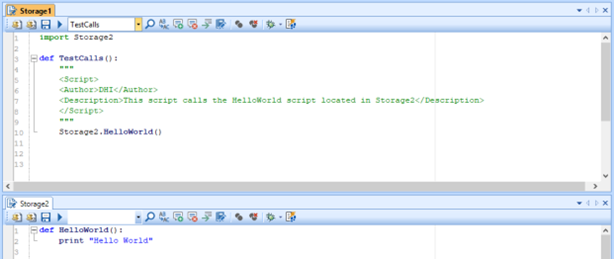
Sometimes, it is important to organize scripts in different storages. For example, this can be useful if several scripts with the same name need to be create. In order to be able to call scripts from one storage to another one, it is required to reference the storage using the import keyword and provide the full name of the script to use, as we can see below.
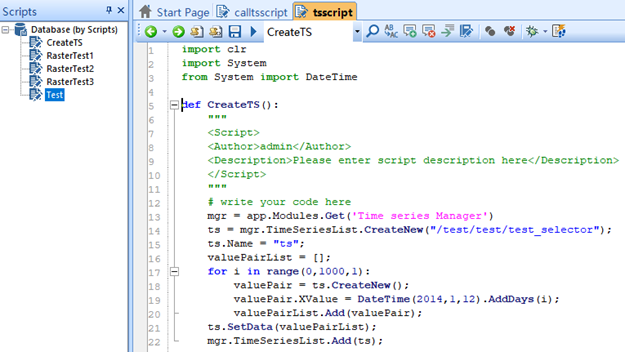
Navigate in the Script Editor
User can navigate backward and forward using several ways:
- Ctrl+- or Ctrl+Shift+- short keys.
- Backward and Forward toolbar button.
Using Python Packages
MIKE WORKBENCH includes some standard libraries and packages which can be imported into a script when using the Python version installed with MIKE OPERATIONS.
- IronPython scripts will always use Python packages installed with MIKE OPERATIONS
- CPYTHON scripts will use Python packages/modules installed with the activated Python version (refer to the section about Using Pip to install Python modules).
The packages and libs are located in the following sub-directories under the MIKE OPERATIONS installation folder:
- python-pkgs
- python-stdlib
It is possible to add other packages in other folders and use them in Script Manager code. The Script Manager searches paths in this way:
- The temporary folder of the MIKE WORKBENCH script storages involved in the script execution (they are exported to disk when script is run)
- The python-stdlib folder
- The python-pkgs folder
- Folders mentioned in environment variable PYTHONPATH
So, creating this environment variable as a semi-colon separated list of your normal python package and lib folders prior to starting MIKE WORKBENCH, packages placed in the folder, available to scripts in MIKE WORKBENCH as well.
Note that the environment variable and the packages need to exist on the executing machine, i.e. on the server when running on that machine.
Using Pip to import Python Modules
When using CPython scripts in MIKE WORKBENCH, it is possible to import
Python modules using pip install.
It is important that modules are installed in the active Python installation. MIKE OPERATIONS is finding the Python installation to use in the following way:
- Specify a custom Python DLL path (from MIKE OPERATIONS 2024.1)
A custom Python installation can be specified on the script module, to be shared by all script providers containing CPython scripts.
Specifying the custom Python DLL path, will override searching for other Python installation (point 2-4 below).
In the script explorer, specify the full path to the Python DLL to use including the file name.
Python installation are usually found in%LOCALAPPDATA%\Programs\Python.
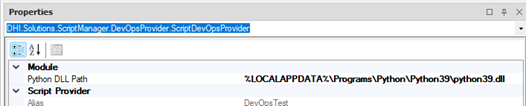
!!! note Note that MIKE OPERATIONS must be restarted after changing the Python DLL Path in case the script engine has already been initialized with the previous settings.
- PYTHONPATH env. variable
Python installations specified in the PYTHONPATH environment variable will override any other Python installation. a. In case FEFLOW is installed, the FEFLOW Python installation will be used (Python 3.11). FEFLOW includes the 'ifm' library for working with FEFLOW models. Python modules of the MIKE OPERATIONS installation will be used. b. Else the first Python installation (containing apython[version].dll) will be used, using Python modules of the Python installation. -
Use the activated Python version
The activated Python version is found using thepython --versionfrom a command prompt.a. If the activated version is found in the registered Python Paths (
where python), this version is used. b. Search for the active Python version in the Windows: - Program Files - Program Files (x86) - User programs (default Python installation path) -
Python installation of MIKE OPERATIONS
If no Python installation was found, the Python installation of MIKE OPERATIONS will be used. The Python modules of MIKE OPERATIONS should be installed in[MIKE OPERATIONS installation bin folder]\python-stdlib\python\site-packages(e.g.C:\Program Files (x86)\DHI\MIKE OPERATIONS\2024\bin\python-stdlib\python\site-packages).
Note
Note that on Linux, MIKE OPERATIONBS will use the latest version of Python installed in the '/usr/lib' folder.
The MIKE OPERATIONS backend can run on Linux using Microsoft .NET 6.0 and later, e.g. using by container images.
Please refer to DHIDevelopers
for more information about using MIKE OPERATIONS in containers.
The following sample shows how to import the numpy module.
- Open a cmd prompt and run
cd /d C:\Users\[user]\AppData\Local\Programs\Python\Python37\Scripts, find your Python installation folder. -
Run the command
pip install --target="[<site-packages folder\]" numpy.
The site-packages folder should be the folder of the active Python installation.
E.g.pip install --target=" C:\Program Files (x86)\DHI\MIKE OPERATIONS\2024\bin\python-stdlib\python\site-packages" numpy -
Open MIKE WORKBENCH and create a storage. Remember to change the script type in the property grid to CPython.

-
The script below will import the numpy module.
import numpy as np

def PrintArray():
    """
    <Script>
    <Author>admin</Author>
    <Description>Numpy sample script</Description>
    </Script>
    """

    a = np.array([1,2,3,4,5])
    np.savetxt(r"c:\Temp\array.txt", a)
After running, the file array.txt can be found in the c:\temp\ folder containing this array.
Walk-Through: Get the Values of a Time Series
This section describes how to retrieve the values of a time series using the script.
Step 1 - Create a new script storage
In order to write a script, a new script storage to store customised script functions must be created. This process to create a new storage is as follows:
- Select the storage view.
- Right-click on the root (the Database node) in the storage explorer. The script manager's context menu is shown in Figure 4.
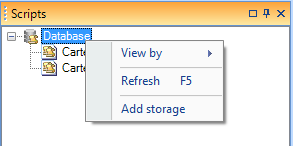
"Add storage" menu
- Click Add storage menu to create a new storage.
- Right-click on the newly create storage. Context menu is shown in Figure 5 below.
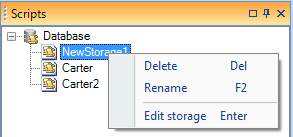
Menu strip for storage
- Click Rename to rename the storage, then, for example, set the name to
GetTimeseriesValues.
Step 2 - Edit the script storage
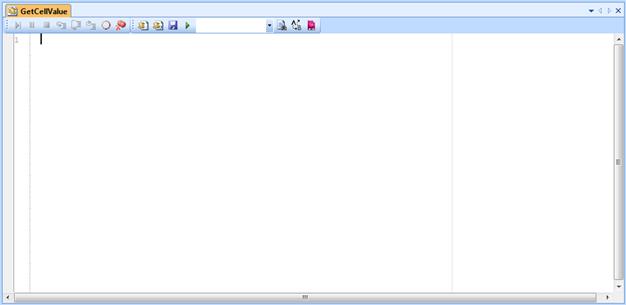
After adding a new storage or clicking the Edit storage menu as depicted in Figure 5, the following editor (Figure 6) will be shown as a data view in the MIKE CUSTOMISED platform. The tools in the editor will be discussed later in the Hints and best practices section of this document.
Script editor
Step 3 - Write the script function
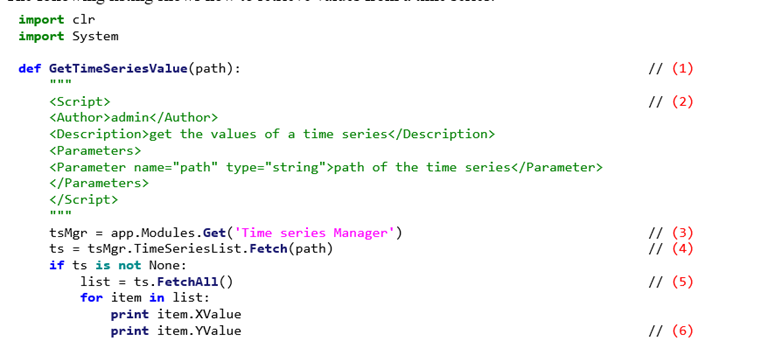
The following listing shows how to retrieve values from a time series.
Script to get values of a time series
Note the following:
- Define a script function named
GetTimeSeriesValuewith one input parameter which is the path of a time series. - Add comments in the script. Actually, you do not need to add these comments manually. There are tools and menus in the editor to insert the Script without arguments and Script with arguments which will insert the comments in a newly created script function. You just need to update them. The Hints and best practices section in this document will describe in detail how to simplify the editing of a script.
- Get the time series manager module: The app object represents the built-in IApplication interface which is available for scripts. The method to access the module in a script function is the same as in standard dotnet programming language. Please refer to document /2/ in the Reference documents table.
- Use the Fetch(string path) method to retrieve the TimeSeriesList from the database.
- Use FetchAll() method to get all value pairs of the time series.
- Loop over the data list and print the date times and values.
Create a New Time Series
This section describes how to create a new time series, set its data values and save it to the database using script. As described in the Walk-Through: Get the values of a time series section, you first need to create a new storage which can be named CreateTimeSeries and then open the script editor to write the script functions.
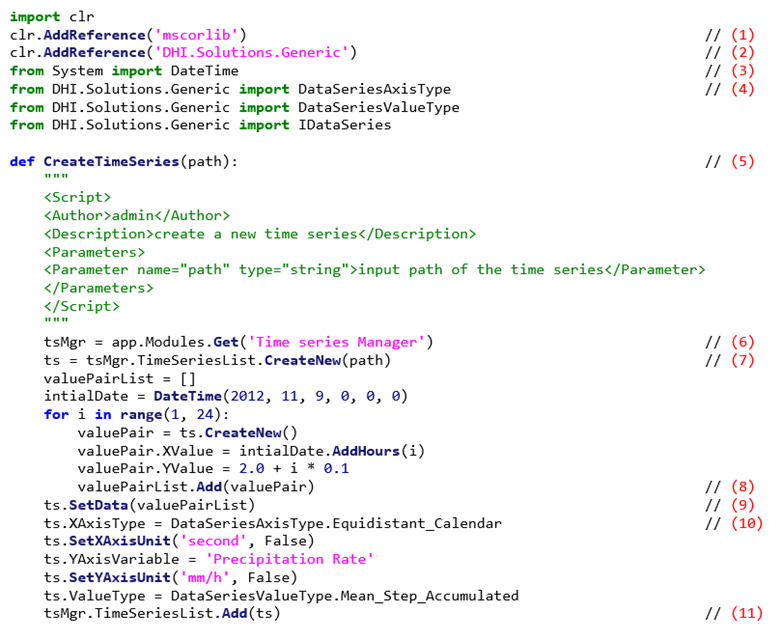
The following listing demonstrates the script function to create a new time series and save it to the database.
Script to create a new time series
Note the following:
- Add reference to the mscorlib assembly.
- Add reference to the DHI.Solutions.Generic assembly.
- Import the DateTime class from System namespace which is defined in the mscorlib assembly.
- Import the DataSeriesAxisType, DataSeriesValueType and IDataSeries classes from the DHI.Solutions.Generic module.
- Define a script function named CreateTimeSeries with one input parameter which is the path of the new time series.
- Get the time series module.
- Create a new time series using the CreateNew(string path) method.
- Create a list of IDataSeriesValuePair.
- Set the above newly created data to the new time series.
- Set the properties of the newly created time series.
- Save the newly created time series to the database via Add(IDataSeries entity) method in the TimeSeriesList class.
Update an Existing Time Series
This section describes how to update an existing time series and save the changes to the database using script. The first and second steps here are the same as the first and second steps in the Walk-Through: Get the values of a time series section. The newly created storage can be named UpdateTimeSeries.
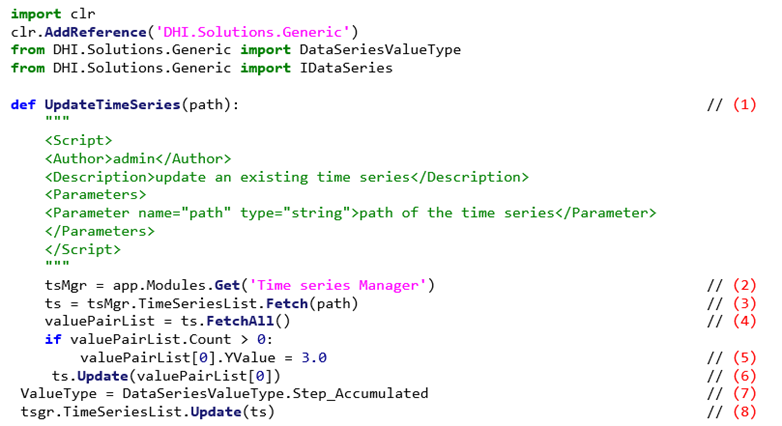
The following listing shows how to update a time series using scripts.
Script to update an existing time series
Note the following:
- Define a script function named UpdateTimeSeries with one input parameter which is the path of an existing time series.
- Get the time series module.
- Get the time series from the database using Fetch(string path) method of the TimeSeriesList class.
- Get all of the data of the above time series from database.
- Change the value of the first value pair if the count of data list is greater than zero.
- Use Update(IDataSeriesValuePair dataSeriesValuePair) to update the above change of data to the database.
- Set a new value to the ValueType of the existing time series.
- Save the above type change to the database via Update(IDataSeries entity) method of the TimeSeriesList class.
Export a Time Series Using the TimeseriesExportTool
This section describes how to export a time series using the TimeseriesExportTool defined in the time series manager via script.
The first and second steps here are same as the first and second steps in the Walk-Through: Get the values of a time series part. The name of the newly created storage can be ExportTS.
The following listing demonstrates the definition of the script function used by the TimeseriesExportTool to export a time series.
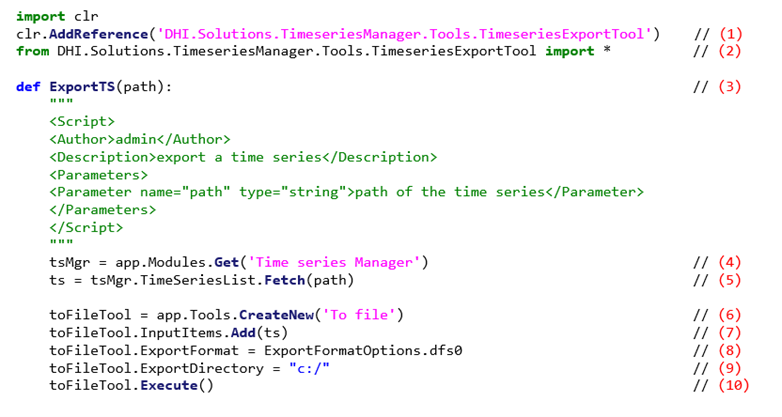
Script to export a time series
Note the following:
- Add reference to the DHI.Solutions.TimeseriesManager.Tools.TimeseriesExportTool assembly.
- Import all the class or variable definitions in the above assembly.
- Define a script function named ExportTS with one input parameter which is the path of a time series.
- Get the time series module.
- Get the time series from the database using Fetch(string path) method.
- Create a TimeseriesExportTool by using CreateNew(string toolName) method of the Tools class.
- Add the fetched time series to the input items of the export tool.
- Set the ExportFormat property of the export tool. It defines the format of the exported file. Use dfs0 as an example.
- Set the ExportDirectory property of the export tool. It defines the directory of the exported file.
- Execute the export tool. A dfs0 file will be created in the specified export directory.
Execute a Scenario
This section describes how to execute a scenario via script. You will also need to create a new storage and open the storage editor first as described in the Walk-Through: Get the values of a time series Section. The new storage can be named ExecuteScenario.
After following the above steps, write the script as in the following listing, to implement the function of executing a scenario.
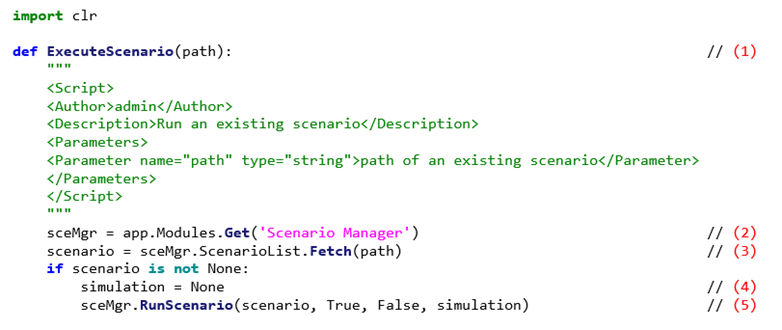
Script to execute a scenario
Note the following:
- Define a script function named ExecuteScenario with one input parameter which is the path of an existing scenario.
- Get the module of scenario manager.
- Get the scenario from the database using the Fetch(string path) method.
- Define a simulation variable.
- Execute the scenario via the RunScenario(IScenario scenario, bool runModelGUI, bool approveSimulation, ref ISimulation simulation) method defined in the scenario module class.
Get a Simulation of an Executed Scenario
This section describes how to get a simulation of an executed scenario via script. The first and second steps are the same as the first and second steps in the Walk-Through: Get the values of a time series section. The new storage can be named GetSimulation.
The following listing shows the script function to get the latest simulation of a scenario.
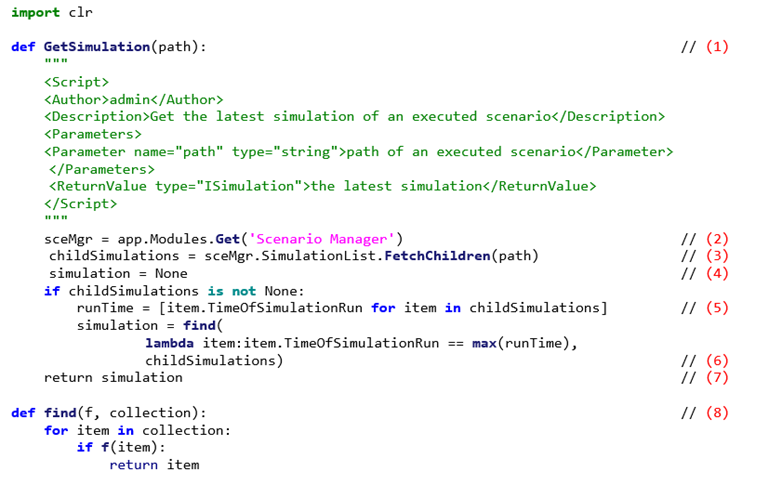
Script to get the latest simulation of an executed scenario
Note the following:
- Define a script named GetSimulation with one input parameter which is the path of an executed scenario.
- Get the scenario manager module.
- Get all simulations of a scenario specified by the input scenario path from the database by the FetchChildren(string groupPath) method of the SimulationList class.
- Define a simulation variable.
- Get the run time list of the above child simulations.
- Get the latest simulation of the specified scenario by calling find function defined in the same storage.
- Return the result simulation.
- Define a function named find in the same storage. This function will be used to retrieve an item from a collection, matching it up according to a search criteria. As the function does not have the formatted comments, it will not be treated as a script entity in the script manager.
Get Attributes from a Feature Class
This section describes how to retrieve attributes from a feature class using script. Firstly you would need to create a new storage and open the storage editor which has been introduced in the Walk-Through: Get the values of a time series section. The storage can be named as GetFeatureAttributes. After that, write the script functions in the editor to get a feature class' attributes, similar to those shown in the following listing. Take the Countries feature class as an example.
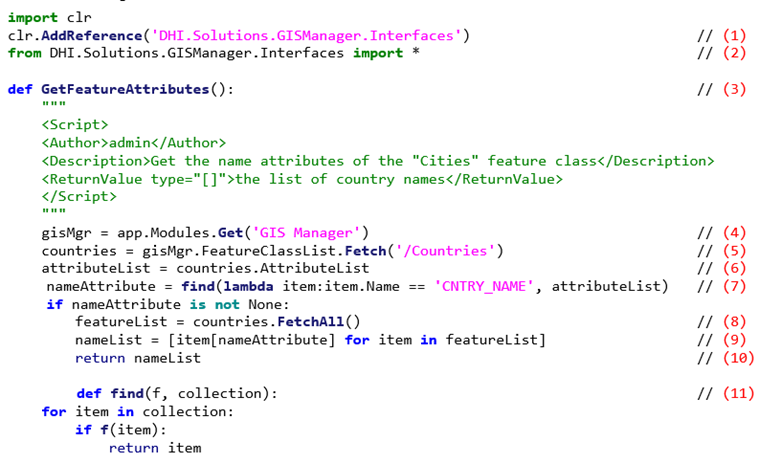
Script to get the name attribute of Countries feature class.
Note the following:
- Add reference to the DHI.Solutions.GISManager.Interfaces assembly.
- Import all classes and variables defined in the above assembly.
- Define a script function named GetFeatureAttributes which has no input parameters.
- Get the module of GIS manager.
- Get the Countries feature class from the database using the
Fetch(string path)method. - Get the attribute list of the above feature class.
- Get the name attribute from the attribute list by calling the find function defined in the same storage.
- Get all features of the Countries feature class from the database via the
FetchAll()method of theIFeatureClassclass. - Get the list of name values by using this
[IFeatureClassAttribute attribute]property of the IFeature class. - Return the result value list of name attribute.
- Define a function named find to return the item, matching it up according to search criteria. If nothing is found, it will return
None. It is not a script entity as it does not have formatted comments.
Get and Set a Cell Value in a Spreadsheet
This section describes how to get or set a cell's value in a spread sheet using script. The first and second steps here are the same as the first and second steps in the Walk-Through: Get the values of a timeseries section. The name of the newly created storage can be GetSetCellValue.
After adding the storage and opening the editor, write the script code, as indicated in the following listing, to the editor to get a cell value from a specified spread sheet or to set a cell value in a specified spread sheet.
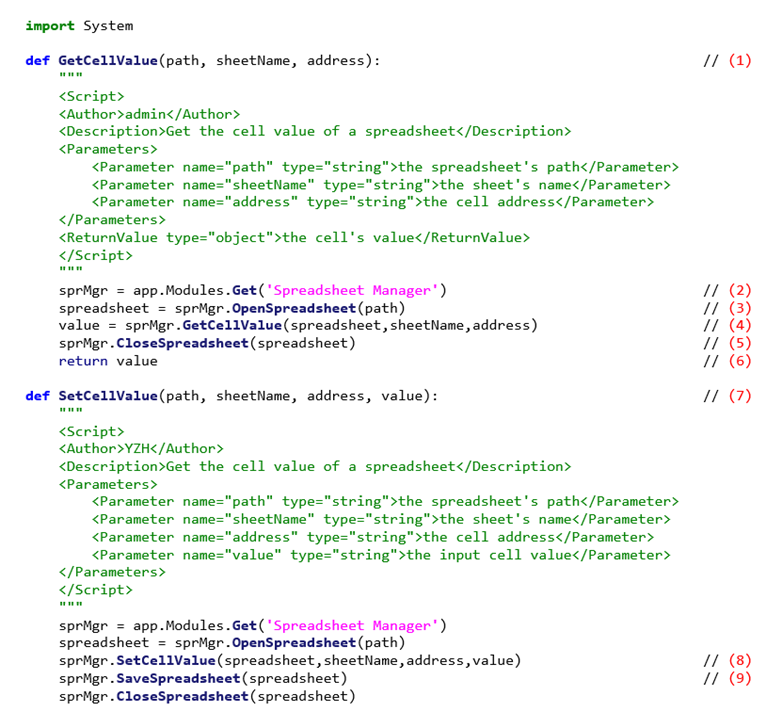
Script to get/set a cell value
Note the following:
- Define a script function named GetCellValue with three parameters. These parameters are: the path of the spreadsheet, the name of a specific sheet in the spreadsheet and the cell address in the sheet.
- Get the module of spreadsheet manager.
- Open the spreadsheet using the OpenSpreadsheet(string path) method in the spreadsheet manager module.
- Get the cell value using the GetCellValue(ISpreadsheet document, string sheetName, string reference) method in the module.
- Close the spreadsheet using CloseSpreadsheet(ISpreadsheet document) method in the module.
- Return the cell value.
- Define a script function named SetCellValue with four parameters being, the path of a spreadsheet, the worksheet name in the spreadsheet, the cell address in the worksheet and the new input cell value. This function is defined in the same storage as the GetCellValue function.
- Set the cell value using the SetCellValue(ISpreadsheet document, string sheetName, string reference, object value) method in the module.
- Save the change using the SaveSpreadsheet(ISpreadsheet document) method.
Make a Spreadsheet Event Handler Function
This section describes how to make a spread sheet event handler script function. The spread sheet event handler is used to implement the functionality of executing a script by clicking a push button in the spread sheet. An event handler function should have two parameters. The first being EventSender which is a type of ISpreadsheetScriptEventSender and second parameter is Control which is a type of ISpreadsheetControl. These two parameters are required when defining an event handler script. The Hints and best practices section later in this document, will discuss these two parameters in more detail.
In order to make a spread sheet event handler function, you first need to create a new storage and then open the storage editor as described in the Walk-Through: Get the values of a time series section and name the storage NameSelectedEvent.
The following listing demonstrates what a spread sheet event handler function looks like.
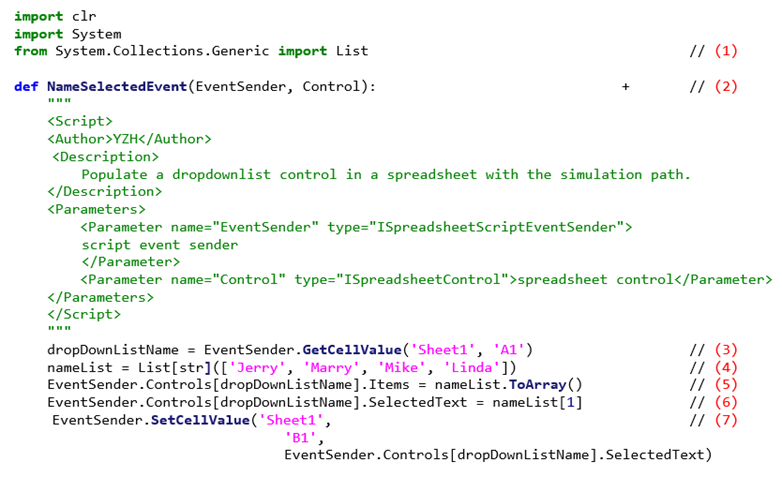
Script of spread sheet event handler
The script in the above listing tries to populate a combo box in a spreadsheet.
Note the following:
- Import List from the System.Collections.Generic module.
- Define an event handler script named NameSelectedEvent which has two parameters.
- Get the combo box name using the GetCellValue(string sheetName, string reference) method of EventSender.
- Define a name list which contains four items.
- Populate the specified combo box using the above defined name list. Use the Controls property of the EventSender to get the combo box.
- Set the second item as the selected one in the combo box.
- Set the text of the selected item to a specified cell using the SetCellValue(string sheetName, string reference, object value) method of EventSender. The following figure shows a spread sheet that uses the above eventhandler.
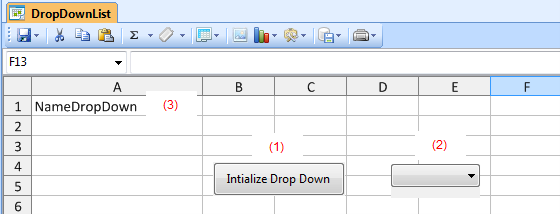
Spreadsheet using the populating drop down list event handler
Note the following:
- Right-click on this button and the following context menu is shown:
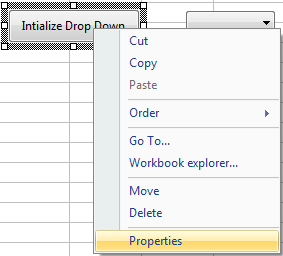
Menu strip of control in a spread sheet
By clicking the Properties menu, the relevant properties for this button will show in the property grid.
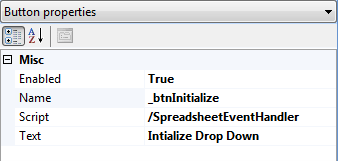
Button properties
By setting the path of the event handler script to the Script property and clicking this button, the event handler script will be executed.
- This is the dropdown list control. Its properties can be set just like the button. Set its name as NameDropDown.
- The value of cell A1 is the name of the above dropdown list. It is used in the above event handler example.
Use third party packages
Third party package compatible with IronPython can be imported in the script manager. The Script Manager does not support non-.NET package (e.g. numpy).
The package should be copied in MIKE OPERATIONS's installation folder \python-stdlib\site-packages.

Then it can be directly used in a script using the 'import' command.